Description
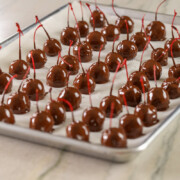
Chocolate covered cherries are perfect for the holidays with their delicious liquid centers holding a cherry and covered in scrumptious chocolate. These chocolate covered cherries taste like Queen Anne chocolate covered cherries and are the real deal. Bet you can't just have one! These are perfect to add to your Christmas candy making list. It's easier than you think to achieve gourmet chocolate covered cherries for any occasion.
Ingredients
1 1/2 Tbsps butter or margarine
4 3/4 cup powdered sugar
3.5 ounce can sweetened condensed milk
3 tablespoons Cherry juice
1/8 teaspoon cream of tartar
1/2 teaspoon almond extract
12 oz Chocolate wafers, callets or bar (chopped if using a chocolate bar)
70 maraschino cherries
Instructions
Using stemmed cherries without a chocolate mold:
Strain cherries then arrange on a rack to dry. Separate them to not touch each other.
Measure out powdered sugar then sift into a medium mixing bowl.
In a medium bowl or stand mixer, add butter, sweetened condensed milk, cherry juice, almond extract, and cream of tartar. Using the beater bar, mix until smooth, then add about half the sifted powdered sugar. Scrape down sides as needed. Add remaining powdered sugar, mix until combined.
The fondant will be pliable but not super sticky. Test by squeezing fondant between your fingers. There should not be residue left on your fingers. If the fondant sticks to your fingers, add powdered sugar, 1 Tablespoon at a time.
Weigh out approximately 0.3 oz fondant or half dollar size of fondant.
First, roll the fondant into a ball. Next, press the fondant into a flat circle. Place cherry in the middle of the fondant circle. Fold the fondant up around the cherry leaving a hole at the stem. This allows the chocolate to seam in the liquid. If the fondant is on the stem the fondant will not stay sealed inside.
Finally, roll fondant covered cherries between fingers back and forth to smooth out edges and make round.
Place fondant covered cherries on prepared parchment paper lined sheet pan.
Approximately halfway through applying fondant, preheat oven to 180°F. Place 3/4 of the chocolate in oven-proof bowl, then place bowl in oven and turn oven off. Or heat chocolate either using the water bath or microwave method by heating in 15 second increments.
Continue checking on chocolate by using a digital thermometer. Remove chocolate at 105°F for milk chocolate or white chocolate then add the remaining chocolate, stirring until 88°F for milk & white chocolate. Remove dark chocolate at 122°F and add remainder of chocolate, stirring until reaches 91°F for dark chocolate.
Dip each cherry then continue dip up the stem about 1 inch and return to parchment paper. Freeze tray of completed chocolate covered cherries into the freezer for about 10 minutes.
Reheat chocolate, remove cherries. Dip cherries one additional time and up the stem about 1 inch.
Let cherries sit at room temperature for at least 1 hour. (Preferably 3 hours with moving from parchment paper.) Place finished cherries in a glass or plastic sealed container for 2-4 weeks at room temperature. Preferably a dark area like the back of a cabinet. These are typically ready about 2 weeks.
Notes
Temper your chocolate: Nobody wants dull-looking chocolate after all the hard work. Melt 3/4 of chocolate needed, next, remove white or milk chocolate when it reaches 105°F then add the remaining chocolate, stirring until 88°F. Remove dark chocolate at 122°F and add remainder of chocolate, stirring until reaches 91°F for dark chocolate. Milk Chocolate is ready to dip at 88 °F. Milk chocolate contains more milk fat with a lower melting point. Dark Chocolate is ready to dip at 91 °F. Dark chocolate has less milk fat with a slightly higher melting point. White chocolate can be dipped at 80 to 82°F or follow the milk chocolate instructions. Tempered chocolate can be stored for several months at 65°F. Chocolate will seize if comes in contact with water and then cannot be tempered. Read our full tips on Tempering Chocolate.
Start making these mid-November or right after Thanksgiving in order to be ready by Christmas.
The centers of these need to turn to liquid and can take up to two weeks in a sealed container. The extra amount of powdered sugar lengthens the time for the centers to turn liquid, use sparingly. This recipe as written takes 2 weeks for liquid centers.
- Prep Time: 180
